Required Softwares
Oracle 11g XE
ATG10.1.1
Jboss-eap-5.1
SqlDeveloper
Eclipse
Step 1: Create a connection with system/admin in Sql developer,system is just like a administrator hence using system schema will create our own schema/user 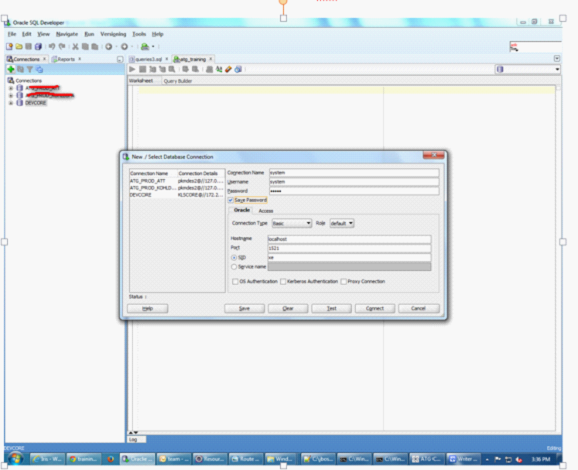
Step 2: In system, create a table space like atgtablespace.DBF with the help of following query and create a User in that table space and grant permissions to that user like,hence all our tables will store in our own schema under the path C:\oraclexe\app\oracle\oradata\XE
atg_dev.
create tablespace atg_tablespace
logging
datafile 'C:/oraclexe/app/oracle/oradata/XE/atgtablespace.DBF'
size 32m
autoextend on
next 32m maxsize 2048m
extent management local;
create user atg_dev identified by atg_dev default tablespace atg_tablespace;
grant connect,resource,dba to atg_dev;
commit;
Step 3:
Create a new database connection with
Connectionname: atg_dev
Username: atg_dev paassword:atg_dev

Step 4:
For getting all OOTB tables into our schema we have to run those tables into our own schema
In atg_dev, Execute below scripts sequence order from the sql developer.
\ATG\ATG10.1.1\DAS\sql\install\oracle\das_ddl.sql
\ATG\ATG10.1.1\DPS\sql\install\oracle\dps_ddl.sql
\ATG\ATG10.1.1\DSS\sql\install\oracle\dss_ddl.sql
\ATG\ATG10.1.1\DCS\sql\install\oracle\dcs_ddl.sql
Step 5: We need to create ds file like atg_ds. xml in the folder
C:\jboss-eap-5.1\jboss-as\server\dev\deploy
<?xml version="1.0" encoding="UTF-8"?>
<datasources>
<!-- @version $Id: //product/CIM/version/10.1.1/plugins/Base/filetemplate/jboss-open-ds.xml#1 $$Change: 690623 $-->
<xa-datasource>
<jndi-name>ATGProductionDS</jndi-name>
<isSameRM-override-value>false</isSameRM-override-value>
<min-pool-size>5</min-pool-size>
<max-pool-size>100</max-pool-size>
<blocking-timeout-millis>5000</blocking-timeout-millis>
<idle-timeout-minutes>15</idle-timeout-minutes>
<transaction-isolation>TRANSACTION_READ_COMMITTED</transaction-isolation>
<xa-datasource-class>oracle.jdbc.xa.client.OracleXADataSource</xa-datasource-class>
<xa-datasource-property name="URL">jdbc:oracle:thin:@localhost:1521:xe</xa-datasource-property>
<xa-datasource-property name="Password">atg_training</xa-datasource-property>
<!-- Uncomment the following if you are using Oracle 9i
<xa-datasource-property name="oracle.jdbc.V8Compatible">true</xa-datasource-property>
-->
<exception-sorter-class-name>
org.jboss.resource.adapter.jdbc.vendor.OracleExceptionSorter
</exception-sorter-class-name>
</xa-datasource>
<!-- @version $Id: //product/CIM/version/10.1.1/plugins/Base/filetemplate/jboss-oraclethin-xa-ds.xml#1 $$Change: 690623 $-->
</datasources>
<!-- @version $Id: //product/CIM/version/10.1.1/plugins/Base/filetemplate/jboss-close-ds.xml#1 $$Change: 690623 $-->
In this Datasource file we need to change URL, username, Password as per our data base schema
URL: jdbc:oracle:thin:@localhost:1521:xe
Username: atg_dev
Password: atg_dev
JNDI Name: We can give anything but same name we need to mention in JTDataSource property file of your component. <Jndi-name>ATGProductionDS</Jndi-name>
Step 6: In the module we need to create JTDataSource.properties file in the path atg/dynamo/service/jdbc/JTDataSource.properties
Need to Give following code in atg/dynamo/service/jdbc/JTDataSource.properties
$class=atg.nucleus.JNDIReference
JNDIName=java:/ATGProductionDS
Step 7: Create deploy.bat and run.bat in your module.
set ATG_HOME=C:\xxx\ATG\ATG10.1.1\home
set ATG_ROOT=C:\xxx\ATG\ATG10.1.1
set DYNAMO_HOME=C:\xxx\ATG\ATG10.1.1\home
set DYNAMO_ROOT=C:\xxx\ATG\ATG10.1.1
set JAVA_HOME=C:\Program Files (x86)\Java\jdk1.6.0_35
set JBOSS_HOME=C:\jboss-eap-5.1\jboss-as
set PATH=%PATH%;%JAVA_HOME%\bin;%JBOSS_HOME%\bin;
set CLASSPATH=%JBOSS_HOME%\lib;%JAVA_HOME%\lib;
cd %ATG_HOME%\bin
runAssembler %JBOSS_HOME%\server\dev\deploy\Atg.ear -m DafEar.Admin Training
Run.bat
set ATG_HOME=C:\xxx\ATG\ATG10.1.1\home
set ATG_ROOT=C:\xxx\ATG\ATG10.1.1
set DYNAMO_HOME=C:\xxx\ATG\ATG10.1.1\home
set DYNAMO_ROOT=C:\xxx\ATG\ATG10.1.1
set JAVA_HOME=C:\Program Files (x86)\Java\jdk1.6.0_35
set JBOSS_HOME=C:\jboss-eap-5.1\jboss-as
set PATH=%PATH%;%JAVA_HOME%\bin;%JBOSS_HOME%\bin;
set CLASSPATH=%JBOSS_HOME%\lib;%JAVA_HOME%\lib;
cd C:\jboss-eap-5.1\jboss-as\bin
run -c dev -b localhost | ATGLogColorizer_v1_2
Note: If you want to change the port number
Go to--> C:\jboss-eap-5.1\jboss-as\server\dev\deploy\jbossweb.sar\server.xml
Then create a new atg project in eclipse.

Then have to run deploy.bat like below

Then run.bat just like same.
Before starting the application we have to change the port number because 8080 is already using by the oracle server hence we have to change the port in the locations.
C:\xxx\jboss-eap-5.1\jboss-as\server\dev\deploy\jbossweb.sar
Dev our own path
connectionTimeout="20000" redirectPort="8443" />
And also in default folder path also
C:\xxx\jboss-eap-5.1\jboss-as\server\dev\default\jbossweb.sar
<Connector protocol="HTTP/1.1" port="8888" address="${jboss.bind.address}"
connectionTimeout="20000" redirectPort="8443" />
Small modification in step 6 so that newbie can have clarity:create JTDataSource.properties file in ATG_HOME/localcongig
ReplyDeletewe can create it in our module level also, its not recommended any configuration files creation in localconfig path of ATG_HOME.
Delete