Step 2: In system, create a table space like atgtablespace.DBF with the help of following query and create a User in that table space and grant permissions to that user like,hence all our tables will store in our own schema under the path C:\oraclexe\app\oracle\oradata\XE
atg_dev.
create tablespace atg_tablespace
logging
datafile 'C:/oraclexe/app/oracle/oradata/XE/atgtablespace.DBF'
size 32m
autoextend on
next 32m maxsize 2048m
extent management local;
create user atg_dev identified by atg_dev default tablespace atg_tablespace;
grant connect,resource,dba to atg_dev;
commit;
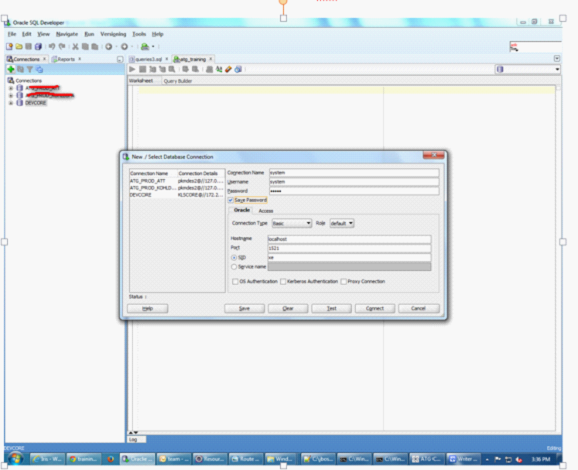
Step 3:
Create a new database connection with
Connectionname: atg_dev
Username: atg_dev paassword:atg_dev
Step 4:
For getting all OOTB tables into our schema we have to run those tables into our own schema
In atg_dev, Execute below scripts sequence order from the sql developer.
\ATG\ATG10.1.1\DAS\sql\install\oracle\das_ddl.sql
\ATG\ATG10.1.1\DPS\sql\install\oracle\dps_ddl.sql
\ATG\ATG10.1.1\DSS\sql\install\oracle\dss_ddl.sql
\ATG\ATG10.1.1\DCS\sql\install\oracle\dcs_ddl.sql
Step 5: We need to create ds file like atg_ds. xml in the folder
C:\jboss-eap-5.1\jboss-as\server\dev\deploy
<?xml version="1.0" encoding="UTF-8"?>
<datasources>
<!-- @version $Id: //product/CIM/version/10.1.1/plugins/Base/filetemplate/jboss-open-ds.xml#1 $$Change: 690623 $-->
<xa-datasource>
<jndi-name>ATGProductionDS</jndi-name>
<isSameRM-override-value>false</isSameRM-override-value>
<min-pool-size>5</min-pool-size>
<max-pool-size>100</max-pool-size>
<blocking-timeout-millis>5000</blocking-timeout-millis>
<idle-timeout-minutes>15</idle-timeout-minutes>
<transaction-isolation>TRANSACTION_READ_COMMITTED</transaction-isolation>
<xa-datasource-class>oracle.jdbc.xa.client.OracleXADataSource</xa-datasource-class>
<xa-datasource-property name="URL">jdbc:oracle:thin:@localhost:1521:xe</xa-datasource-property>
<xa-datasource-property name="User">atg_training</xa-datasource-property>
<xa-datasource-property name="Password">atg_training</xa-datasource-property>
<!-- Uncomment the following if you are using Oracle 9i
<xa-datasource-property name="oracle.jdbc.V8Compatible">true</xa-datasource-property>
-->
<exception-sorter-class-name>
org.jboss.resource.adapter.jdbc.vendor.OracleExceptionSorter
</exception-sorter-class-name>
</xa-datasource>
<!-- @version $Id: //product/CIM/version/10.1.1/plugins/Base/filetemplate/jboss-oraclethin-xa-ds.xml#1 $$Change: 690623 $-->
</datasources>
<!-- @version $Id: //product/CIM/version/10.1.1/plugins/Base/filetemplate/jboss-close-ds.xml#1 $$Change: 690623 $-->
In this Datasource file we need to change URL, username, Password as per our data base schema
URL: jdbc:oracle:thin:@localhost:1521:xe
Username: atg_dev
Password: atg_dev
JNDI Name: We can give anything but same name we need to mention in JTDataSource property file of your component. <Jndi-name>ATGProductionDS</Jndi-name>
Step 6: In the module we need to create JTDataSource.properties file in the path atg/dynamo/service/jdbc/JTDataSource.properties
Need to Give following code in atg/dynamo/service/jdbc/JTDataSource.properties
$class=atg.nucleus.JNDIReference
JNDIName=java:/ATGProductionDS
Step 7: Create deploy.bat and run.bat in your module.
set ATG_HOME=C:\xxx\ATG\ATG10.1.1\home
set ATG_ROOT=C:\xxx\ATG\ATG10.1.1
set DYNAMO_HOME=C:\xxx\ATG\ATG10.1.1\home
set DYNAMO_ROOT=C:\xxx\ATG\ATG10.1.1
set JAVA_HOME=C:\Program Files (x86)\Java\jdk1.6.0_35
set JBOSS_HOME=C:\jboss-eap-5.1\jboss-as
set PATH=%PATH%;%JAVA_HOME%\bin;%JBOSS_HOME%\bin;
set CLASSPATH=%JBOSS_HOME%\lib;%JAVA_HOME%\lib;
cd %ATG_HOME%\bin
runAssembler %JBOSS_HOME%\server\dev\deploy\Atg.ear -m DafEar.Admin Training
Run.bat
set ATG_HOME=C:\xxx\ATG\ATG10.1.1\home
set ATG_ROOT=C:\xxx\ATG\ATG10.1.1
set DYNAMO_HOME=C:\xxx\ATG\ATG10.1.1\home
set DYNAMO_ROOT=C:\xxx\ATG\ATG10.1.1
set JAVA_HOME=C:\Program Files (x86)\Java\jdk1.6.0_35
set JBOSS_HOME=C:\jboss-eap-5.1\jboss-as
set PATH=%PATH%;%JAVA_HOME%\bin;%JBOSS_HOME%\bin;
set CLASSPATH=%JBOSS_HOME%\lib;%JAVA_HOME%\lib;
cd C:\jboss-eap-5.1\jboss-as\bin
run -c dev -b localhost | ATGLogColorizer_v1_2
Note: If you want to change the port number
Go to--> C:\jboss-eap-5.1\jboss-as\server\dev\deploy\jbossweb.sar\server.xml
Then create a new atg project in eclipse.