Wednesday, 21 January 2015

Differences between CartModifierFormHandler & ShoppingCartFormHandler?

1.CartModifierFormHandler :- Used to modify the shopping cart by adding items, deleting items and modifying the quantities of items in cart and preparing for checkout.

  ShoppingCartFormHandler Used for handling cart management (add/remove/adjust item quantity) and checkout process (shipping, billing, committing order).

2.CartModifierFormHandler :- you would have to handle checkout flow yourself by using ExpressCheckoutFormHandler in case of express checkout and in case of full checkout by using ShippingGroup & PaymentGroup form handlers and finally CommitFormHandler to confirm and commit the ordr.

  ShoppingCartFormHandler :- Various functions for cart to checkout are exposed via different handleXXX methods.

3.CartModifierFormHandler :-doesn't provide you the checkout flow.

  ShoppingCartFormHandler :- provides simpler cart management and checkout implementation all in itself.

4.CartModifierFormHandler :- would provide some benefits like better handling and security for concurrent updates of orders.

  ShoppingCartFormHandler  : not that much secure for concurrent updates of orders

5.CartModifierFormHandler:Based implementation would not be that simple and require other form handlers.

  ShoppingCartFormHandler  : simple and all checkout flow provided by it.

Thursday, 6 November 2014

Assigning Items to Shipping Groups In ATG

                   when ever first order is created,it has an empty shipping group,this will serves as default shipping group,this default shipping group is defined by a property defaultShippingGroupType in OrderTools component.
OrderTools.properties
defaultShippingGroupType=hardgoodShippingGroup
1.If there is a only one shipping group,if you add any commerce item to order that item is part of default shipping group.
Ex1:
Shipping group : default shipping group.
Commerce Items : ci1,ci2,ci3,ci4
Order : all the items will set to default shipping group
2.if there is any other shipping groups in order,then the items we have to explicitly assigned to one of the existed shipping groups.
Ex2:
Shipping group : sgp1,sgp2
Commerce Items : ci1,ci2,ci3
Order : so order contains 3 items and 2 shipping groups
1. ci1 and ci2 we are setting to sgp1
2. c i3 setting to sgp2
Before order is checked every item in the order must and should part of shipping group(s),this requirement check by the validateForCheckout pipeline,validateForCheckout pipeline validates a different part of theOrder as complete.

In validateForCheckout pipelinechain we have one processor validateShippingGroupsForCheckout,this processor validates the shipping groups in the order.As per the ATG,shipping group will complete when ever it met the below criteria.

I..name, address, city, state, and postal code these fields should not be empty in ShippingGroup

II.All of the items in order should be assigned to shipping group,for this some requirements are there.

            If there is only one ShippingGroup in the Order and no relationships exist between that ShippingGroup and the commerce items in the Order, then the shipping of all commerce items in the Order implicitly is accounted for by that ShippingGroup.

             If there is only one ShippingGroup in the Order and relationships exist between that ShippingGroup and the commerce items in the Order, or if there is more than one ShippingGroup in the Order, then every CommerceItem in the Order must have its shipping explicitly accounted for with one or more ShippingGroupCommerceItemRelationship objects, as follows:

              *1.If a CommerceItem has a ShippingGroupCommerceItemRelationship of type ShippingQuantityRemaining, then the item’s shipping is accounted for regardless of whether it has other shipping relationships. This is because a “remaining” relationship type covers any quantity of the CommerceItem that is not accounted for by other shipping relationships.

              *2.If a CommerceItem has one or more ShippingGroupCommerceItemRelationship objects of type ShippingQuantity, but no relationship of typeShippingQuantityRemaining, then the total quantity of the CommerceItem covered by the relationships must be equal to or greater than the quantity in theCommerceItem.
The range property in the ShippingGroupCommerceItemRelationship identifies which particular items out of the total quantity of a CommerceItem are associated with a given ShippingGroup.

Wednesday, 5 November 2014

Pipeline Customization in ATG


Pipeline is a collection of processors which executes sequentially.

 Step 1 : Updated commercepipeline.xml to add new processor class

 Step 2 : Here we are injecting the new processor class as the sepcond processor in the updateOrder chain.
 Step 3 :we have to Register the new processor as a nucleus component.


 Step 4 :we have to create Custom Processor class that should be an implementation of PipelineProcessor
 Step 5 :Restart your ATG  Server.

Explanation :
OOTB : \config\atg\commerce\commercepipeline.xml
<?xml version="1.0" encoding="UTF-8" standalone="no"?>
      <pipelinemanager>
       <pipelinechain name="updateOrder" transaction="TX_REQUIRED" headlink="updateOrderObject">
        <pipelinelink name="updateOrderObject" transaction="TX_MANDATORY">
            <processor jndi="/atg/commerce/order/processor/SaveOrderObject"/>
            <transition returnvalue="1" link="updateCommerceItemObjects"/>
        </pipelinelink>

        <pipelinelink name="updateCommerceItemObjects" transaction="TX_MANDATORY">
            <processor jndi="/atg/commerce/order/processor/SaveCommerceItemObjects"/>
            <transition returnvalue="1" link="updateShippingGroupObjects"/>
        </pipelinelink>
..........
   </pipelinemanager>
 
 
Step 1 and Step2 :Customization/Configuration:
   <pipelinemanager>
       <pipelinechain name="updateOrder" transaction="TX_REQUIRED" headlink="updateOrderObject">
        <pipelinelink name="updateOrderObject" transaction="TX_MANDATORY">
            <processor jndi="/atg/commerce/order/processor/SaveOrderObject"/>
            <transition returnvalue="1" link="checkInventoryObject"/>
        </pipelinelink>

<pipelinelink name="checkInventoryObject" transaction="TX_MANDATORY">
            <processor jndi="/inventory/processor/ProcCheckInventory"/>
            <transition returnvalue="1" link="updateCommerceItemObjects"/>
       </pipelinelink>

        <pipelinelink name="updateCommerceItemObjects" transaction="TX_MANDATORY">
            <processor jndi="/atg/commerce/order/processor/SaveCommerceItemObjects"/>
            <transition returnvalue="1" link="updateShippingGroupObjects"/>
        </pipelinelink>
...........
   </pipelinemanager>
 
Step3 : ProcCheckInventory.properties(/inventory/processor/ProcCheckInventory)
        $class=/info/atgblog/inventory/processor/ProcCheckInventory

Step4 :ProcCheckInventory.java

        public class ProcCheckInventory extends ApplicationLoggingImpl implements PipelineProcessor {

          public int[] getRetCodes() {
       return new int{1,2};
        }
  public int runProcess(final Object pParam, final PipelineResult pResult)
throws Exception {
// check inventory and return the status accordingly
return 1;
   }
       }


Tuesday, 4 November 2014

ATG Local Set Up


 Required Softwares
  Oracle 11g XE

  ATG10.1.1
  Jboss-eap-5.1  
  SqlDeveloper
  Eclipse 
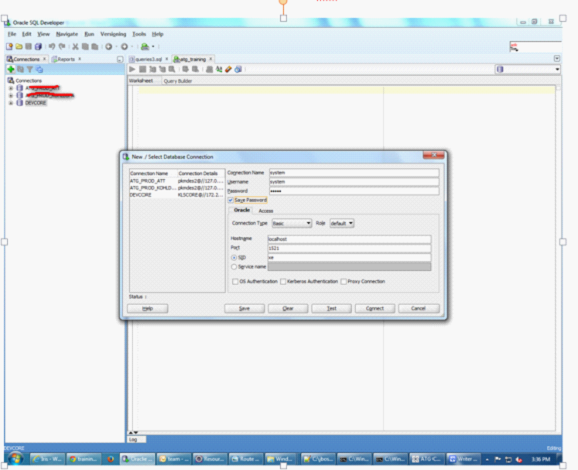
Step 1: Create a connection with system/admin in Sql developer,system is just like a administrator   hence using system schema will create our own schema/user 


Step 2: In system, create a table space like atgtablespace.DBF with the help of following query and create a User in that table space and grant permissions to that user like,hence all our tables will store in our own schema under the path C:\oraclexe\app\oracle\oradata\XE

atg_dev.
create tablespace atg_tablespace
logging
datafile 'C:/oraclexe/app/oracle/oradata/XE/atgtablespace.DBF'
size 32m
autoextend on
next 32m maxsize 2048m
extent management local;
create user atg_dev identified by atg_dev default tablespace atg_tablespace;
grant connect,resource,dba to atg_dev;
commit;
Step 3:
Create a new database connection with 
   Connectionname: atg_dev
   Username: atg_dev        paassword:atg_dev


Step 4: 
   For getting all OOTB tables into our schema we have to run those tables into our own schema
In atg_dev, Execute below scripts sequence order from the sql developer.
\ATG\ATG10.1.1\DAS\sql\install\oracle\das_ddl.sql
\ATG\ATG10.1.1\DPS\sql\install\oracle\dps_ddl.sql
\ATG\ATG10.1.1\DSS\sql\install\oracle\dss_ddl.sql
\ATG\ATG10.1.1\DCS\sql\install\oracle\dcs_ddl.sql


Step 5: We need to create ds file like atg_ds. xml in the folder 
C:\jboss-eap-5.1\jboss-as\server\dev\deploy 
  <?xml version="1.0" encoding="UTF-8"?>
<datasources>
<!-- @version $Id: //product/CIM/version/10.1.1/plugins/Base/filetemplate/jboss-open-ds.xml#1 $$Change: 690623 $-->
<xa-datasource>
          <jndi-name>ATGProductionDS</jndi-name>
          <isSameRM-override-value>false</isSameRM-override-value>
          <min-pool-size>5</min-pool-size>
          <max-pool-size>100</max-pool-size>
          <blocking-timeout-millis>5000</blocking-timeout-millis>
          <idle-timeout-minutes>15</idle-timeout-minutes>
          <transaction-isolation>TRANSACTION_READ_COMMITTED</transaction-isolation>
          <xa-datasource-class>oracle.jdbc.xa.client.OracleXADataSource</xa-datasource-class>
 <xa-datasource-property name="URL">jdbc:oracle:thin:@localhost:1521:xe</xa-datasource-property>


          <xa-datasource-property name="User">atg_training</xa-datasource-property>
          <xa-datasource-property name="Password">atg_training</xa-datasource-property>
          <!-- Uncomment the following if you are using Oracle 9i
          <xa-datasource-property name="oracle.jdbc.V8Compatible">true</xa-datasource-property>
         -->
          <exception-sorter-class-name>
              org.jboss.resource.adapter.jdbc.vendor.OracleExceptionSorter
          </exception-sorter-class-name>
    </xa-datasource>
<!-- @version $Id: //product/CIM/version/10.1.1/plugins/Base/filetemplate/jboss-oraclethin-xa-ds.xml#1 $$Change: 690623 $-->
</datasources>
<!-- @version $Id: //product/CIM/version/10.1.1/plugins/Base/filetemplate/jboss-close-ds.xml#1 $$Change: 690623 $-->
    
In this Datasource file we need to change URL, username, Password as per our data base schema
   
     URL: jdbc:oracle:thin:@localhost:1521:xe
     Username: atg_dev
      Password: atg_dev
JNDI Name: We can give anything but same name we need to mention in JTDataSource property file of your component.  <Jndi-name>ATGProductionDS</Jndi-name>
Step 6: In the module we need to create JTDataSource.properties file in the path atg/dynamo/service/jdbc/JTDataSource.properties
  
 Need to Give following code in atg/dynamo/service/jdbc/JTDataSource.properties
    $class=atg.nucleus.JNDIReference
    JNDIName=java:/ATGProductionDS


Step 7Create deploy.bat and run.bat in your module.


Deploy.bat
   set ATG_HOME=C:\xxx\ATG\ATG10.1.1\home
set ATG_ROOT=C:\xxx\ATG\ATG10.1.1
set DYNAMO_HOME=C:\xxx\ATG\ATG10.1.1\home
set DYNAMO_ROOT=C:\xxx\ATG\ATG10.1.1
set JAVA_HOME=C:\Program Files (x86)\Java\jdk1.6.0_35
set JBOSS_HOME=C:\jboss-eap-5.1\jboss-as
set PATH=%PATH%;%JAVA_HOME%\bin;%JBOSS_HOME%\bin;
set CLASSPATH=%JBOSS_HOME%\lib;%JAVA_HOME%\lib;
cd %ATG_HOME%\bin
runAssembler %JBOSS_HOME%\server\dev\deploy\Atg.ear -m DafEar.Admin Training

Run.bat
set ATG_HOME=C:\xxx\ATG\ATG10.1.1\home
set ATG_ROOT=C:\xxx\ATG\ATG10.1.1
set DYNAMO_HOME=C:\xxx\ATG\ATG10.1.1\home
set DYNAMO_ROOT=C:\xxx\ATG\ATG10.1.1
set JAVA_HOME=C:\Program Files (x86)\Java\jdk1.6.0_35
set JBOSS_HOME=C:\jboss-eap-5.1\jboss-as
set PATH=%PATH%;%JAVA_HOME%\bin;%JBOSS_HOME%\bin;
set CLASSPATH=%JBOSS_HOME%\lib;%JAVA_HOME%\lib;
cd C:\jboss-eap-5.1\jboss-as\bin
run -c dev -b localhost | ATGLogColorizer_v1_2
Note: If you want to change the port number 
   Go to--> C:\jboss-eap-5.1\jboss-as\server\dev\deploy\jbossweb.sar\server.xml
Then create a new atg project in eclipse.

Then have to run deploy.bat like below


Then run.bat just like same.   
Before starting the application we have to change the port number because 8080 is already using by the oracle server hence we have to change the port in the locations.
C:\xxx\jboss-eap-5.1\jboss-as\server\dev\deploy\jbossweb.sar
Dev our own path 


<Connector protocol="HTTP/1.1" port="8888" address="${jboss.bind.address}" 
               connectionTimeout="20000" redirectPort="8443" />
And also in default folder path also 
C:\xxx\jboss-eap-5.1\jboss-as\server\dev\default\jbossweb.sar
<Connector protocol="HTTP/1.1" port="8888" address="${jboss.bind.address}" 
               connectionTimeout="20000" redirectPort="8443" />